About Me

My photo
Colorado Springs, CO
Hey Everyone!! I'm Erika. I'm a 28 year old, fashion loving, food blogging, midwestern girl! I grew up on hearty meals and enjoying the simple life of South Dakota. Ever since leaving home I have found a love for baking and cooking. I started this blog for my family and friends so that they can see how food blog recipes REALLY turn out. When I'm not too busy running the fashion world and have time for the blogging world, I will try to update the blog weekly. I am not a professional and probably never will be, so don't expect too much from me. :) I just love to have fun, get messy and make the simple things. ENJOY!

Tuesday, September 22, 2015

Pumpkin Banana Bread

It's been a year since my last post and I have great reason why....


I became a mama to this handsome boy, Jackson! He is my heart and soul... not to mention he also takes up about 95% of my time.

But the trees are starting to change color, the nights are getting colder and lets be honest, who doesn't want to bake during the Fall? So in honor of tomorrow being the first day of Fall, here is a great recipe and twist on a couple of my favorites, banana and pumpkin bread. (I'm all about killing two birds with one stone!)

Ingredients:• 3 cups flour
• 2 teaspoon baking soda
• 2 teaspoon salt
• 2 teaspoon cinnamon
• 1 teaspoon nutmeg
• 2 teaspoon pumpkin pie spice
• 2 tablespoon unsalted softened butter
• 2 cups light brown sugar
• 1 can pumpkin puree
• 1 1/2 cups chocolate chips
• 2 egg
• 2 teaspoon vanilla
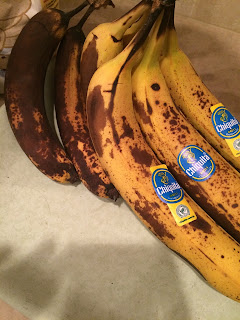
• 3 bananas

Step One:
Preheat oven to 350 degrees. Grease pans.

Step Two:
Combine all dry ingredients into a large mixing bowl and set aside. NOTE: DO NOT include brown sugar as a dry ingredient.

Step Three:
Finely mash bananas

Step Four:
In a mixing bowl, combine butter, brown sugar, pumpkin, eggs, vanilla and mashed bananas. 

Step Five:
Slowly add dry ingredients to wet ingredients while mixing. 

**If you are wanting to add nuts, chocolate chips and/or berries, do so at this time. Fold into mix.**

Step Six:
Pour into two loaf pans and bake uncovered for 40 mins. Cover and bake for another 15-20 mins or until center is dry. 

Step Seven:
Serve warm with butter and ENJOY!!


Original Post:
http://www.themomcreative.com/2013/11/easy-chocolate-chip-pumpkin-banana-bread.html

Wednesday, September 3, 2014

Crockpot Beef Stew

"Cooler" temperatures are slowing but surely coming and that means soup season is here! I have been looking for new soups or stews that would fit my on the go lifestyle. I stumbled upon this recipe on Pinterest and knew it would be worth a shot!

Prep time is about 30-45 mins and cook time can be done in your slow cooker while you are at work. I made mine on my day off so I could test out the time limits and found that 4 1/2 hours on high will fully cook your stew or 7 1/2 - 8 hours on low.

This would be plenty of soup for a family of 4-5 OR in our case, dinner tonight and lunch tomorrow! WINNING!!

Lastly, ingredients for this soup are relatively cost effective and I do suggest checking your local farmers market first! The total cost for this soup was $17($3.50 a serving) and I still have carrots and celery left for snacking!

Cozy up and ENJOY!

~Erika


Ingredients:
2 lbs of stew meat
3 large carrots, cleaned and peeled
2 celery stalks, cleaned and chopped
3 large russet potatoes, cleaned/peeled/cubed
4 cups of beef broth
1 cup diced onion
5 gloves of garlic
1 cup dry red table wine
1 tablespoon balsamic vinegar
1-2 teaspoons of Italian seasoning
1 bay leaf
Pepper to taste

                                                  **Not pictured-Onion,Garlic, Balsamic**

Step One:
Turn crock pot on to desired temp for cook time.
Season stew meat with salt and pepper. Brown meat in a pan with olive oil. Once all meat has been browned, throw into crock pot.

Step Two:
Prep carrots, potatoes, onions, garlic and celery. Add to crock pot with the meat, beef broth, seasonings and remaining ingredients.

Step Three:
Cover with lid and let cook. Times do vary depending upon desired meal time.
7 1/2-8 hours on low
4 1/2-5 hours on high

**If you are going to cook this while you are at work, the low setting will work perfectly for most jobs. OR you can always use your lunch hour to run home and start the soup on high!**

Step Four:
ENJOY!


Original Post:
http://inspiringpretty.com/2013/09/06/fall-crockpot-beef-stew/

Thursday, April 24, 2014

Peanut Butter Chex Patties

Do you love peanut butter? Do you love scotcharoos? Do you love desserts?
Ok. Good.

I started making this recipe the other night and ran out of peanut butter when it came time to top my patties and I said, the heck with it, these babies are delicious even without chocolate! Crazy, I know!
I will however give you the instructions to make the chocolate topping!

My only disclaimer is to make sure you have patience when it comes to this recipe because the main step takes a few mins of waiting around, stirring, waiting around, stirring... well you get the point!

Most of the ingredients I had at home but if you don't bake a lot, these are easy to find at a grocery store because many times the isle are right next to each other! :)


Simple Ingredients:
**Not pictured- Peanut Butter b/c I used fresh grounded**Store bought is just as awesome!
6 Cups of Chex Cereal
1 Cup light corn syrup
1 cup sugar
2 cups of peanut butter (1/2 cup used for topping)
2 cup semi sweet chocolate chips (topping)
2 cups butterscotch chips (topping)
1 teaspoon vanilla (topping)

Step One:
Butter mixing bowl, add chex cereal to bowl and set aside.
In a small pan combine and melt corn syrup and sugar. Make sure to stir occasionally and remove promptly once it comes to a boil.

Step Two: 
Add 1 1/2 cups of peanut butter to syrup and mix until combined. Pour over cereal and fold until all cereal is covered.


Step Three:
Place parchment paper onto baking sheet or lightly grease. Form cereal into small balls and lay flat. They will start to take their own shape when they cool but this is OK!! Allow to cool for about 30 mins and ENJOY.... or move to making the chocolate topping!


Topping:
In a microwave safe bowl, combine 1/2 peanut butter, chocolate chips, butterscotch chips and vanilla. Place into the microwave and stir every 10 seconds to avoid burning the chocolate!

Scoop or pour onto patties, let cool and as always...ENJOY!!

Orignal Recipe:
completerecipes.com

Tuesday, October 1, 2013

Pumpkin Bread

Lots of cooking and baking has been going on in my household! Lots of that has been done not only with love but beside my love! It's been fun baking with and for Craig. His number one request for Fall.... PUMPKIN BREAD!!

He doesn't enjoy all the icing or cream cheese on everything pumpkin so I searched out and found a great pumpkin bread recipe that doesn't need the sweet stuff to make it fantastic! 

This recipe makes a TON OF BREAD!! It would be perfect for Fall gifts, wrapped up and delivered. OR in my case, we just froze the loafs we didn't need right away! It will make 3 average size loafs but if you don't have 3 loaf pans, I had one small loaf pan and one large (deep) one that I used. 

I hope you are all enjoying the change of colors and the start of Fall! ENJOY!


Ingredients:
1 15 oz can of pumpkin puree
4 Eggs
1 Cup Vegetable Oil
2/3 Cup of Water
3 Cups of White Sugar
3 1/2 Cups of All-Purpose Flour
2 Teaspoons of Baking Soda
1 1/2 Teaspoons of Salt
1 Teaspoon of Cinnamon
1 Teaspoon of Nutmeg
1/2 Teaspoon of Ground Cloves
1/4 Teaspoon of Ground Ginger


Step One:
Preheat oven to 350 Degrees. Grease and flour bread pans with non-stick cooking spray
In a large mixing bowl, mix eggs, oil, water, pumpkin and sugar until well blended.


Step Two:
In another large mixing bowl, mix together remaining ingredients; flour, salt, baking soda, cinnamon, nutmeg, cloves and ginger.
Step Three:
Slowing add the dry ingredients to the wet ingredients, while mixing with a mixer. 

Step Four:
Pour into pans and bake. The baking time will differ depending on the size of your loaf pan. My regular size loaf pan took 50 mins. My big loaf pan took 80 mins. (I did cover my larger loaf at about 50 mins so that the top wouldn't burn.)

Step Five:
Let cool, serve and ENJOY!!


Original Recipe:
http://allrecipes.com/recipe/downeast-maine-pumpkin-bread/

Sunday, September 22, 2013

Sharp Cheddar with Broccoli and Ham Quiche

I have been wanting to make a quiche for some time but always thought they would be difficult. Can you tell I'm an amateur!? Talk about EASY!! Well at least this recipe is!

Prep time is no more than 10 mins with pre-heating of the oven. Not to mention, the smell of this recipe is mouth watering. Perfect amount of food for 3-4 people and could be made morning of! ENJOY!


Ingredients:
1 stick of butter
1 Cup of Half and Half
1 Cup of thawed frozen hash browns
1 Cup of shredded sharp cheddar cheese
Chopped green onion
1/2 Cup of chopped ham
1/2 Cup of broccoli
3 Eggs


Step One:
Preheat oven to 450 degrees. Spray pie pan with non-stick spray. Melt stick of butter and mix with hash browns. Press into pie pan to form a crust. Cook for 20-25 mins.


Step Two:
Lower oven to 350 degrees.
Whisk eggs and 1/2 and 1/2 in a mixing bowl. Chop onion and broccoli and dice the ham. Add to eggs along with the cheese. Mix. Spread onto of cooked crust and place back into oven for 30-40 mins.


Step Three:
Allow the quiche to cool and serve with sour cream (optional). Lastly, ENJOY!


Original Recipe: Paul Deen (Food Network)

Sunday, July 14, 2013

Baked Spaghetti

Sorry for the pathetic run at blogging lately! I am trying to get motivated to start cooking/baking again. Working 50hrs a week and living in a beautiful state, I tend to spend my days off in the mountains or trying to find new restaurants! :)

I am a major sucker for Italian food.... well maybe I should just say pasta and needed a dish that would be quick, easy and not overly expensive! I have tried two other baked spaghetti recipes and both of them failed, miserably! PROUD TO SAY.... this one was a success!!

The key to a good Baked Spaghetti is keeping your noodles soft and moist, not hard and dry. A wise guy told me that the more soft cheese you use the better because it won't dry out your noodles. He was right!

So here you have it, a great family recipe or just a great dish for leftovers the next day! Have fun and bon appiete! 

Prep Time: 15 mins
Cook Time: 20

Ingredients: 
24 oz of Ricotta Cheese
8 oz of Mozzarella Cheese
1 Cup of Parmesan Cheese
1 lb of Ground Beef
1 Jar of Marinara (your choice!)
1 Package of Spaghetti Noodles
Tinfoil 


Step One:
Preheat oven to 350 degrees. Line 9x13 pan with tinfoil. 

Step Two:
Cook noodles until soft. Brown meat and drain.

Step Three:
Lay noodles on the bottom of pan. Spread Ricotta cheese over top of noodles to form a nice layer.

Step Four:
Mix marinara sauce with meat. Spread on top of Ricotta cheese.

Step Five:
Top meat sauce with Mozzarella and Parmesan cheeses.

Step Six:
Place into oven (uncovered) for about 20-25 mins. Let cool for about 10 mins. Serve and as always, ENJOY!


Wednesday, March 13, 2013

Red Velvet MilkyWay Cookies

It's a big birthday month at my store!! I have 4 birthdays that I need to find desserts for and zero time to bake and blog! On that note, anything that is quick, easy and takes 20 minutes or less...COUNT ME IN!!

One of my favorite blogs is picky-palate! She has tons of awesome, out of this world recipes and most of the time they are easy and quick! From start to finish this only took me about 20 minutes and everyone LOVED them!!

Enjoy!


Ingredients:
1 box of red velvet cake mix
1 egg
2 tablespoons of vegetable/canola oil
1 stick of soften butter
1 cup of mini chocolate chips
4 regular size MilkyWay bars or Dark MilkyWay Bars


Step One:
Preheat oven to 350 degrees. Line cookie sheet with parchment paper. 

In a medium bowl, mix together cake mix, egg, oil and butter. I recommend doing this with a hand mixer or stand alone mixer to make sure the butter is well combined.

Step Two:
Cut up MilkyWays into small chunks.

Step Three:
Add MilkWays and Chocolate chips to batter and mix together.


Step Four:
Place onto cookie sheet and bake for 11-13 mins. Cool and ENJOY!!


http://picky-palate.com/2013/02/04/red-velvet-milky-way-cake-cookies/